August 31, 2019

Southwest Quilt

This quilt was dreamed up when a professor I taught with at the dental school told me he’d probably retire in 3 years. To me, that’s a signal to at least have a quilt plan in place, but might include having the fabric bought and waiting on my shelf. I pinned a ton of southwest style quilts, but most used just a few colors in their patterns. Knowing the vibrant colors that this colleague uses in his paintings of cowboys, Indians, horses, Buffalo, etc., I needed a quilt pattern with repeating blocks of various colors, and this quilt from Linda Miller that I found on Flickr was quickly my favorite. 


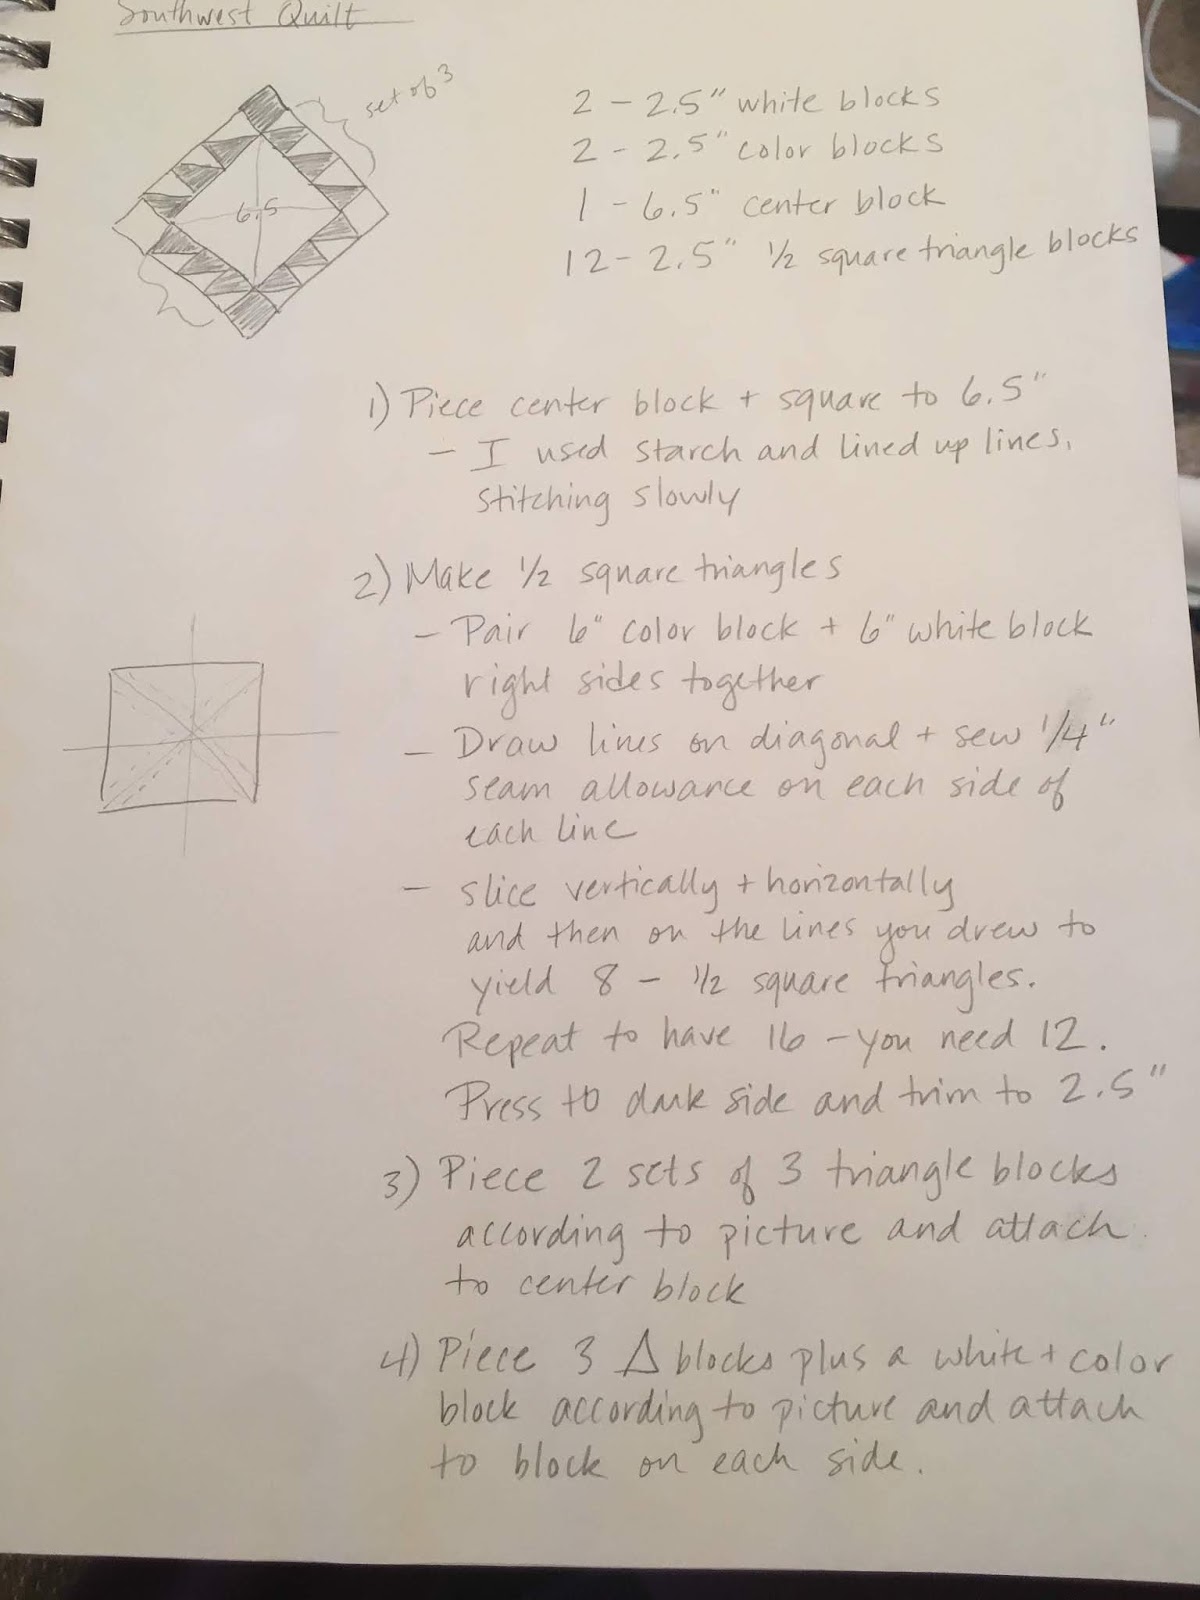
With no pattern, this plan began a frenzy of internet searches for helpful tutorials to make the center square and ALL the 1/2 square triangles I would need to make each block. I  used this tutorial, minus the "tilted" part to achieve the center striped square.  This video from Missouri Star was also very helpful.  There was also a late night discovery of these fantastic textured solids at Connecting Threads that were on clearance, so I stayed up really late one night planning and choosing colors for a quilt I had no pattern for. I hemmed and hawed over which striped fabric to use and then happened upon a stripe at Hobby Lobby and picked up a Southwest backing while I was there. I had a plan, but I needed help, and luckily, a fellow dentist and quilter agreed to do the job, to honor the friend that connected the two of us in the first place. So I drew up a “pattern” for her to follow, precut the pieces, and shipped her part off to Kansas. 


I’ve never been a part of a swap or anything like this, so this was definitely new territory! 

But it all worked out fabulously well, I received her blocks back here in Texas and got to work putting it all together!  I had some lightweight denim to do the border, given to me by a lady who donated fabric to our church group (it was rejected by the group for their donation quilts, so it needed a home!).  I tried this light colored denim first, and quickly cut out the darker shade.


It all just came together!  Well, long story short, it’s a good thing I got my act together and got this moving because he decided to retire in three months instead of three years!  The race was on to hand quilt it, but it all turned out well in the end and it was a blessing to honor this friend that guided so many of us academically and spiritually through a very trying time in our lives, and beyond.


June 14, 2019

Baby Quilts

We had a bunch of babies born at work, so I made a bunch of quilts! 

I didn’t have much time to make them before the group shower, so I chose a very easy pattern called Storytime Squares from Made by Rae. 

One little girl got this sweet quilt made with some left over Fandango and a few other coordinating prints and solids from my stash. 


One little boy received a nautical-themed quilt in navy, grey, and white. 


Another little boy received this quilt made with fabric from the Oh, Boy! collection plus some coordinating solids. 


I machine quilted them and used this as an opportunity to practice machine binding. I still prefer hand stitching the binding, but when pressed for time, it worked well enough!

May 8, 2019

Christmas BOM

Way back, circa 2009, Gail Pan of Gail Pan Designs shared a free Christas BOM called “A Christmas Wish” that was right up my alley. It featured nine embroidered blocks that were so fun, that I printed out the patterns and cut out some ivory squares for the embroidery and then did nothing. Well, I finished dental school and had 2 babies, so I was busy, but, still, it sat as other projects came and went. I believe It was sometime around 2016 when I picked out the embroidery floss and traced the patterns onto the fabric. It was our first camping trip as a family and I wanted a new hand project for the car.


So I sat around the campfire and stitched away on these blocks. At some point, I finished them, and they sat, until one day I realized I had the perfect fabric to sash these blocks with. It all finally came together and I chose to hand quilt the wall hanging with perle cotton in green, white, and maroon. I displayed it during this past Christmas season for the first time!


April 22, 2019

Andrea’s Quilt

I’ve had this quilt on my to-do list for a while, but as it goes for most younger siblings, it took a while  for this busy momma to get it done. I’ve had an idea for the pattern for a while. At first I wanted to do a true Kansas Dug Out or Road to Tennessee pattern, but in the end I came up with a plan using what I had: a layer cake and charm pack of Fandango by Kate Spain for Moda Fabrics. 


I took each 10” square and cut it into fourths and used 2.5” white squares to “dog-ear” two opposing corners on each square. Then I put the four new squares back together to make the “X” - except for one “O”. I added a few solids from my stash to bring the block count up to 48. Then, I whacked the charm pack into fourths and used those as the cornerstones in the 2.5” sashing. 


I hand quilted a large and small petal in each arm of the “X” and filled in the sashing areas with squares using templates I cut out and a wash away marker. 


I bound the quilt in a sweet vintage green and added a label!


I really like to embroider my labels by hand.  


Sometimes I use my own handwriting, but usually I find a simple font and print out the message large enough to stitch.  Then I trace it with a pencil or wash away marker and stitch away!


She loves it and I'm so glad to have quilts on both of my daughters' beds.  Next up....our bed!

April 13, 2019

Sewing desk and Mini Finishes


One project that I finished and haven't posted about yet is my new to me sewing desk.

It was my Aunt's dressing table, but even my grandmother made a cushion for the stool and used it as her sewing desk.  After my grandparents passed, and no one else wanted to take it, including my aunt, I jumped at the opportunity to use it as my sewing table.  I removed all of her notions (most of them really fun and vintage), and took the table home for a redo.


Here you can see the mirror part of the dressing table as I painted it in the garage.  It took a lot of sanding, priming, paint, and podcasts to get it done!


I sprayed the hardware a nice gray.  I took off the old fabric and disintegrating foam and started fresh!


Slowly, but surely, I also finished up a few little minis to put up on my wall.  I found these three granny squares at an antique store, snatched them up, got the stains out, and quilted this little runner.


I found this dresden plate at the same shop.  I couldn't get all the stains out, so I had to carefully cut it out and re-applique the plate to new fabric.  I did a little quilting and added it to my wall!


I also finished up this little cross-stitch I started at work one day.  


Then I added a few things I inherited - this neat folded fabric piece from my NaNa:


A few cathedral windows from my NaNa:


Bluebonnets from my Nanna's house:


And now I have the start of a mini wall!