When Audrey moved up to a convertible car seat, it did not have the best strap covers on it and she'd get these awful red marks on her neck. So, I went and bought a set of cushy strap covers to protect her little neck. Problem was, we had two cars = two car seats. I decided I'd just trace the ones I bought to make a pattern and create my own out of much cuter fabric : )
Miss Andi needs a set now, so I figured I'd take pictures as I made it and show you. Sorry about the crummy phone photos in bad lighting. It's better than nothing!
If you want to make some you will need:
4 scraps of fabric, about 6 x 8 in or so each
(I used a quilting cotton for one side and minky dots for the other),
2 scraps of batting, 6 x 8 in,
about 72 inches of matching bias tape,
matching thread,
about 6 inches of velcro,
pins,
binding clips,
sewing machine,
fabric marker,
pattern
1. Cut out your pattern and be sure to mark the sewing lines. FYI, I have no idea what I'm doing when it comes to making patterns and sizing them so you can print them correctly. Basically, this is a 4.5 x 7.25 in rectangle turned parallelogram. The two sewing lines should be approximately 2.5 inches apart. Just use this as a guide : )
2. trace pattern onto your fabric and batting and cut out the pieces
Be sure to cut out the front and back so they are mirror images of each other so that they match up when wrong sides are facing each other. I just traced the pattern onto the right side of the pink fabric and the wrong side of the minky.
3. Make two little quilt sandwiches with your pieces.
4. Place the pattern back on top of the sandwich, and mark the sewing lines.
I used a contrasting tailor's chalk to make my marks.
5. Pin baste the sandwich together and sew a straight line along the marked lines.
6. I decided to zig zag around the edges to keep everything together before binding.
7. Using your preferred binding method, bind your teeny little quilt sandwich. I'm not going to go into that here. If you need some help with binding, check out this tutorial.
I cut 1.25 in strips for my binding.
Don't be like me...use true bias tape. These curves are pretty serious and you need the give that bias tape provides to turn them easily. Instead, I had to fudge it a bit. And use lots of binding clips.
Tada!
8. Now, cut two lengths of velcro about 3 inches long.
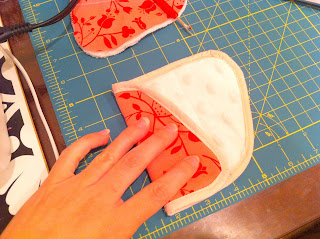
9. Take your strap cover and fold over 1/3 of it along the line you sewed.
This is where you're going to place your velcro.
10. Sew all the way around the hook side of the velcro, attaching it to your strap cover. You might want to lengthen your stitch length for this.
11. Now, you sew the loop side of the velcro to the opposing flap, like so.
Tada!
And it's reversible!
Make 2 of them and you're set!
One happy girl!


.JPG)


.JPG)
No comments:
Post a Comment